
If you’re like me, when connecting to SQL Servers in SSMS that little checkbox in your connection window that says “Trust Server Certificate” is your best friend. Because if a server certificate isn’t properly configured for your SQL Server, and you don’t check that box (or set Encrypt to Optional in your connection window), you’ll get this error message:
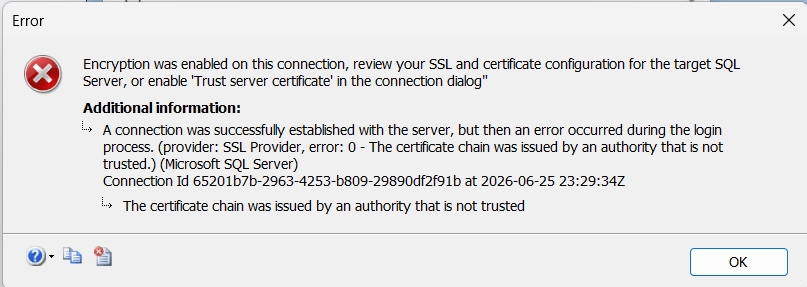
Encryption was enabled on this connection, review your SSL and certificate configuration for the target SQL Server, or enable ‘Trust server certificate’ in the connection dialog”
A connection was successfully established with the server, but then an error occurred during the login process. (provider: SSL Provider, error: 0 – The certificate chain was issued by an authority that is not trusted.) (Framework Microsoft SqlClient Data Provider)
For quite a while, I never paid much mind to this warning. I just went about my day checking the box so I could connect and do whatever task I needed to do. But as we all know, especially in today’s world, if you’re choosing to not take proactive measures to ensure your data is secure end-to-end, then you’re living each day hoping for the best because after all, there are many more impactful reasons to configure and enforce certificates for your servers than just being able to not check a box in your SSMS connection window.
My goal here is to share some knowledge I’ve learned around this, explain what TLS is and how server certificates tie into it, why it’s important, how to configure a proper server side certificate template to use for your SQL Servers and client connections, and how to apply them.
Some Important Things To Clarify
Before we begin diving into this, I want to get some terminology and concepts clear and defined to avoid confusion. I’m going to talk about three separate pieces that all come together to make your data in flight secure.
The first thing is that drivers older than Microsoft.Data.SqlClient 4.0 (not to be confused with the older System.Data.SqlClient) had their encrypt setting set to false by default. SQL Server has always encrypted the login handshake regardless, but with encrypt set to false, that’s where it stopped. Your actual query traffic and results were going across the wire unencrypted. Starting with Microsoft.Data.SqlClient 4.0, encrypt defaults to true, meaning all traffic gets encrypted, not just the handshake. This is where the need to address cert validation became more prevalent, either by trusting the server cert as a workaround or doing it right with a proper cert as a long term solution.
The second thing is TLS. TLS is the protocol used to encrypt data in flight between SQL Server and the clients connecting to it. You’ll still see SSL thrown around in older docs and forum posts but TLS is its successor. SSL is just the older protocol. With encrypt set to true, TLS encrypts the entire pipe your data flows through so it’s not going across the wire as plain text. TLS negotiation is initiated by the client driver, but SQL Server participates in the handshake by presenting its configured certificate. The driver determines whether encryption is requested, but SQL Server provides the certificate and handles encryption once negotiation succeeds.
The last thing is that SSMS 19 and later was released with a new driver underneath the hood which required you to start dealing with server certificate validation and resulted in you having to explicitly check that Trust Server Certificate box in the Options tab in your SSMS dialogue window as a workaround if you didn’t have one set up. Then in SSMS 20+ they moved that checkbox to the main window to make it easier to access.
So, something I want to make clear is that Trust Server Certificate checkbox does not indicate whether you’re using TLS or not. It indicates if your connection is going to validate if you’re talking to a trusted server or not. In other words, you can have an encrypted pipe that your data flows through, but without having proper certs set up on the server side to validate against, you could be talking to an untrustworthy endpoint, which leaves you vulnerable to man-in-the-middle attacks.
What Is Transport Layer Security?
Transport Layer Security (TLS) as it relates to SQL Server is the protocol used to encrypt data in transit between SQL Server and the clients connecting to it. You can find a more technical definition from the Microsoft Learn site. Modern versions of SQL Server use TLS rather than the older SSL protocols, but you’ll still see SSL referenced throughout Microsoft documentation and older tools. If you see SSL in a forum post or error message, they mean the same concept.
One thing to note is that SQL Server automatically generates a self-signed cert if one isn’t configured. That certificate still encrypts the connection, so your data isn’t going across the wire in plain text. The problem is that clients have no way to validate it because it wasn’t issued by a CA they trust. That’s why Trust Server Certificate exists and why you’re required to check it when no proper cert is configured. A cert that is CA-issued solves that problem by giving clients something they can actually validate.
What Does Trust Server Certificate Actually Do?
When you’re indicating that you’re going to be trusting a server’s certificate, you’re telling the connection that it doesn’t need to validate the server’s cert against a Certificate Authority (CA) or verify that the server name on the cert matches the server you’re actually connecting to. That right there is what leaves you exposed to a possible man-in-the-middle attack. The reason for that is because if someone intercepts your connection mid flight, and your connection is not validating its target’s cert, you could be communicating with an imposter. A good way to look at it is that checking Trust Server Certificate doesn’t make your connection any less encrypted, but it could leave you talking to an untrustworthy data source.
Configuring A Proper Server Certificate Template For Your SQL Server
Now, I’m going to be assuming that you’re working in a shop, or are communicating with someone that has or is an AD Admin. As a DBA we’re generally not wearing this type of hat, at least not at this level. Nonetheless, we need to be able to communicate effectively as to what we need with people who have those AD skillsets. Here’s the blurb you can send or use with your AD Admin when requesting them to configure a Server Certificate for SQL Server:
I need a certificate template configured in AD CS for SQL Server TLS. Here are the template configs I need:
- Duplicate the built in Computer template and name it SQL Server TLS Template.
- On the Subject Name tab set it to “Supply in the request”
- Under the Extensions tab in Application Policies make sure that it is just set to Server Authentication
- Under the Cryptography tab, make sure Microsoft RSA and DH SChannel Cryptographic Provider are selected
- Under the Request Handling tab, make sure that Allow private key to be exported is checked
Once the template is configured, please publish it to the CA so I can handle the cert request from the SQL Server side.
Requesting A New Certificate On Your SQL Server
Once your AD Admin has issued the certificate template, the next steps to request it are mostly straightforward, with a little bit of nuance. Here are the steps you can follow:
Step 1: RDP To Your SQL Server
You’re going to need to be connected to the server to cut the cert, so RDP there first.
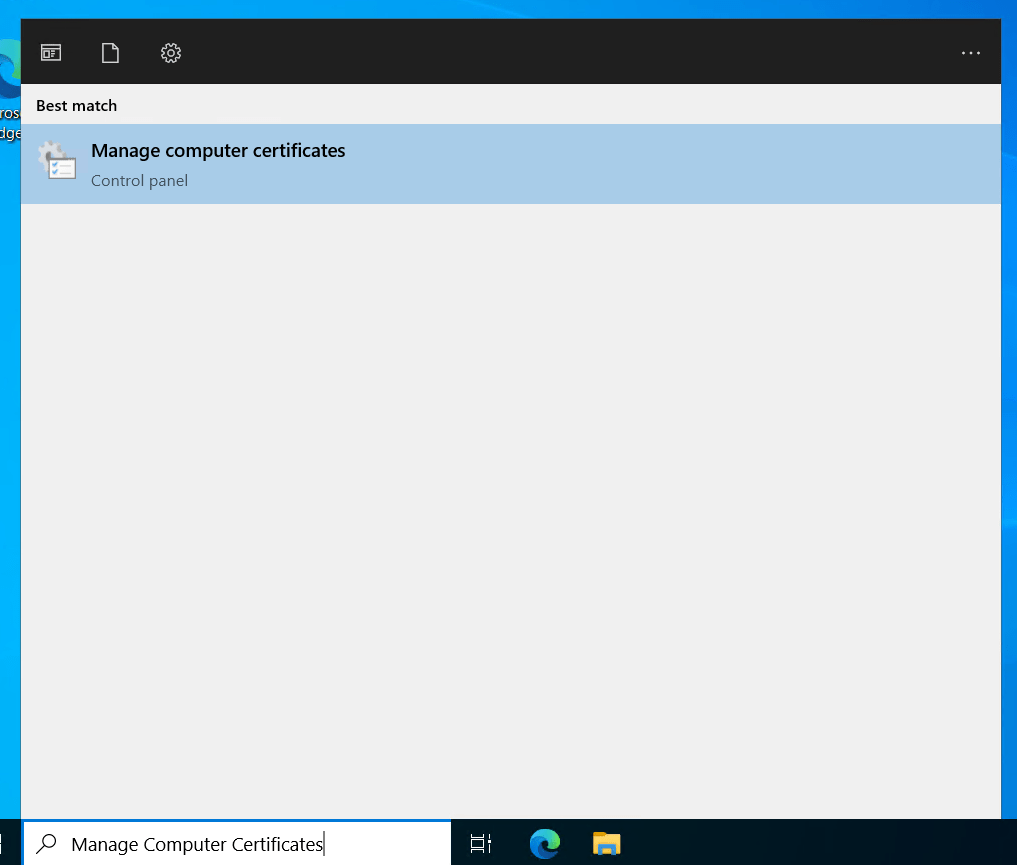
Step 2: Open Computer Certificates
Once there, in the search bar, search for Manage Computer Certificates
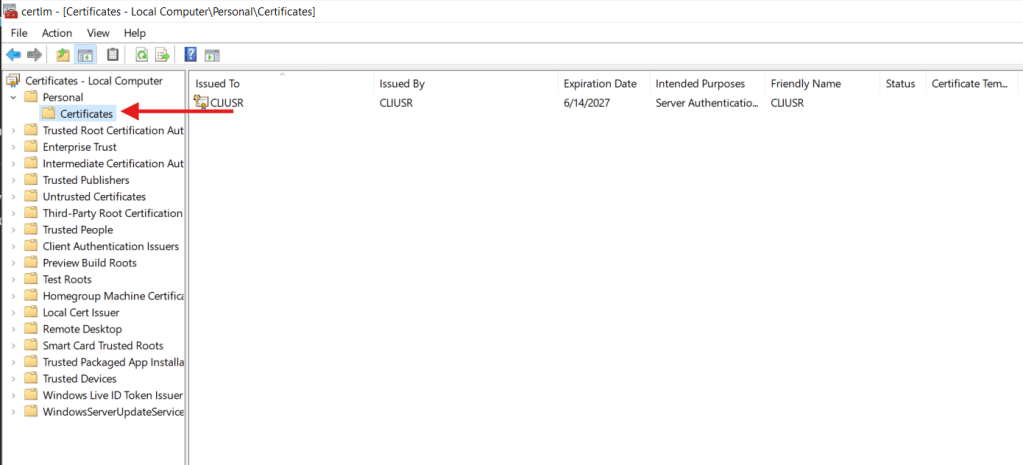
Step 3: Navigate To The Certificates Folder
Expand Personal -> Certificates
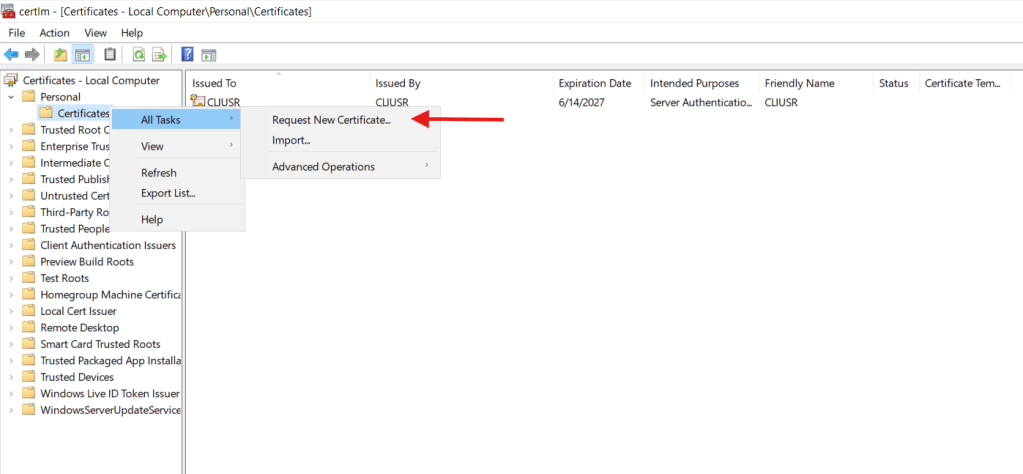
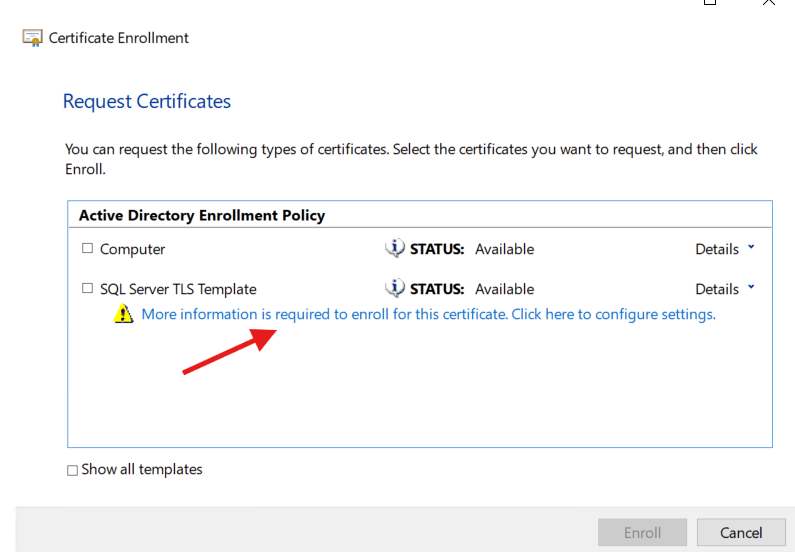
Step 4: Request A New Certificate
Right click on Certificates -> All Tasks -> Request New Certificate
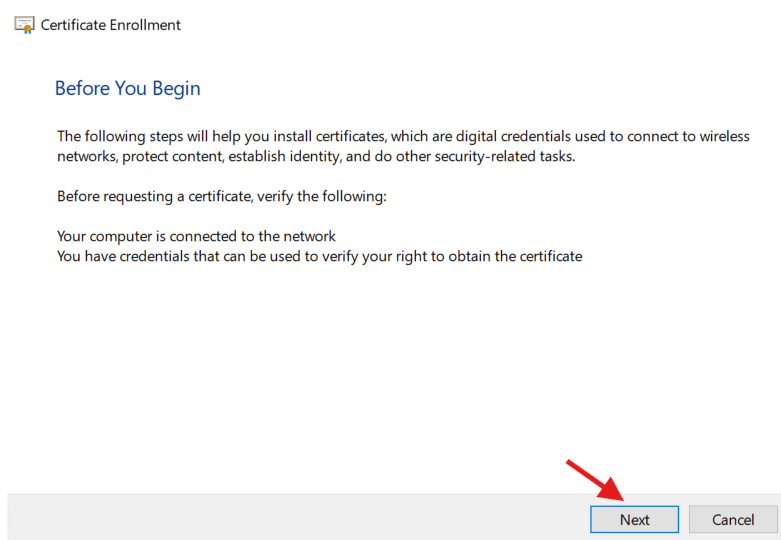
Step 5: Click Through The Wizard
You’re going to be clicking Next until you get to your template that was cut for you
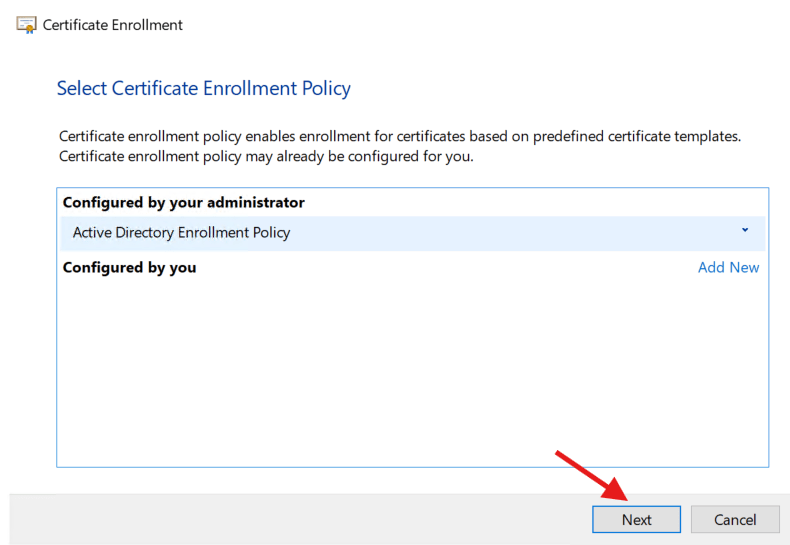
Step 6: Click On The Blue Letters
When you get to the AD Enrollment Policy section, click on the blue letters to configure your Certificate Template
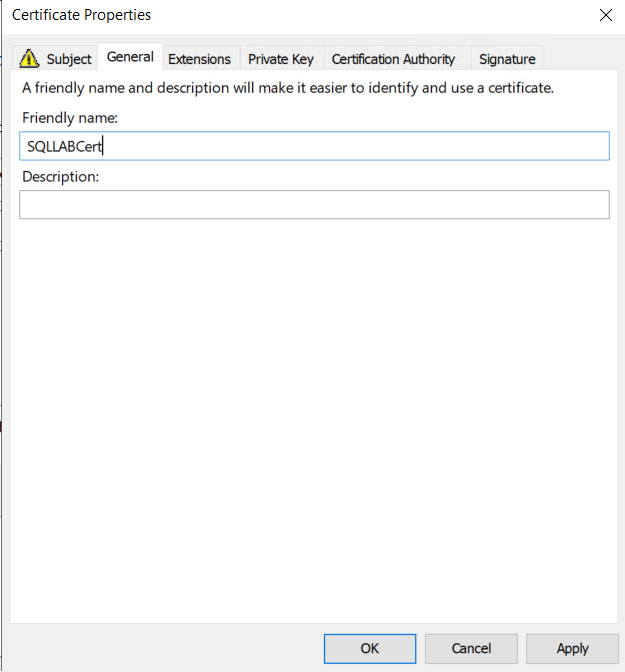
Step 7: Give Your Cert A Friendly Name
The first thing you’re going to want to do is click on the General tab and give your cert a friendly name. I’ve been bitten by this before and forgot to give an identifiable friendly name and couldn’t later identify the cert and had to re-create it. That actually brings me to a good side nuance. Once you create the cert through here, you can’t edit it, you have to completely re-create it. Not a big deal, just annoying to do.
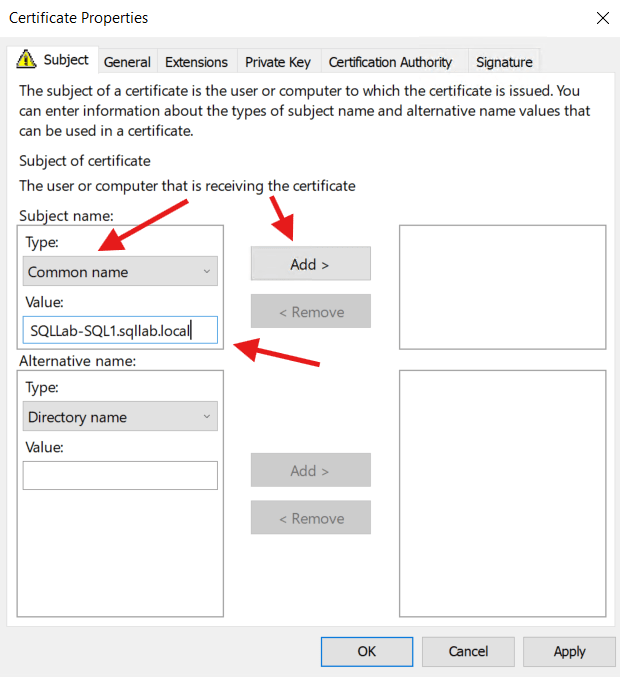
Step 8: Fill Out The Subject Name
This is why in our instructions to our AD Admin we requested to have the Subject name be set to Supply in the request in our template so we can input it for the server we’re configuring. This allows for template reuse between multiple servers.
Notice below that we need to change Type to Common name and in the Value we need to put the Fully Qualified Domain Name (FQDN) of our server. Then hit Add >
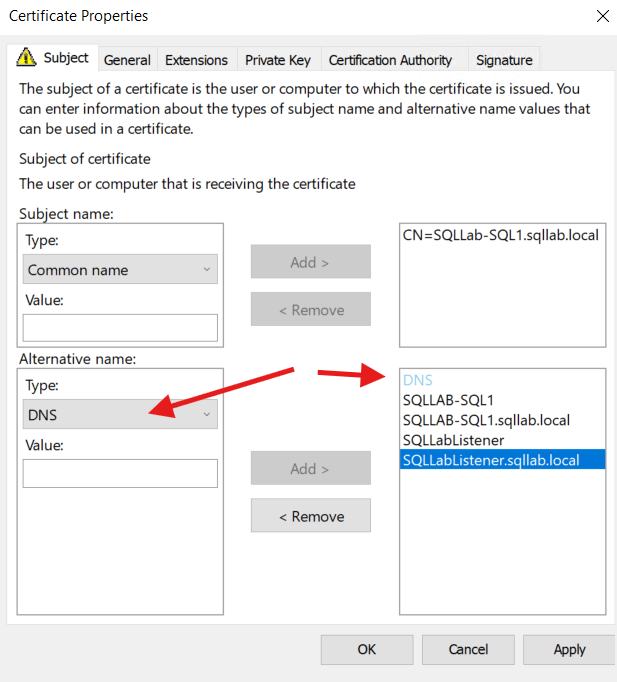
Step 9: Fill Out The Alternative Name Section
This is a crucial step. First, make sure to change the Type to DNS in the drop down menu. This is what allows you and your applications to not only connect to and validate the server certificate under the server name, but also under any friendly names as well (C-Names, DNS entries, etc.). Notice that you are going to want to include an entry for both the short name and the FQDN as well. You’ll also want to include the listener name of your AG as well. Also, if you’re doing this for an AG, you have to make sure you create and implement a cert for each replica all including the listener name as well in the alternative name section.
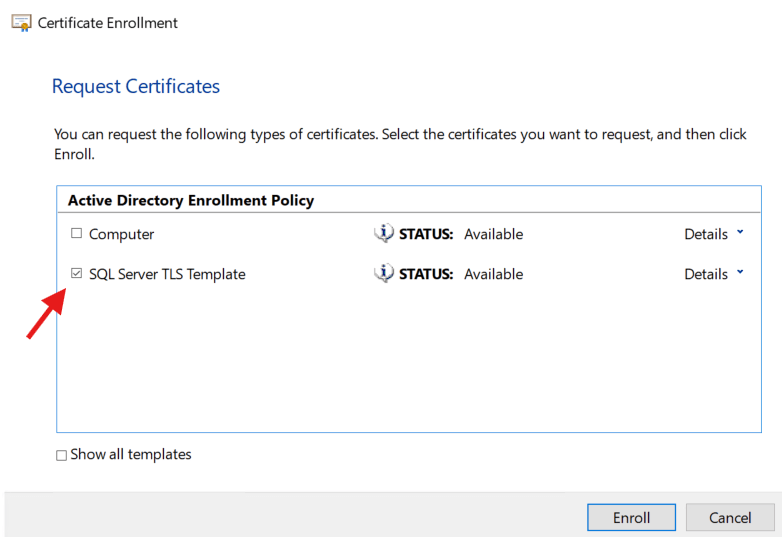
Step 10: Click OK
Click OK and ensure that your new cert was created successfully. Side note, make sure to click the check box on the left side of the template or the Enroll button will stay grayed out.
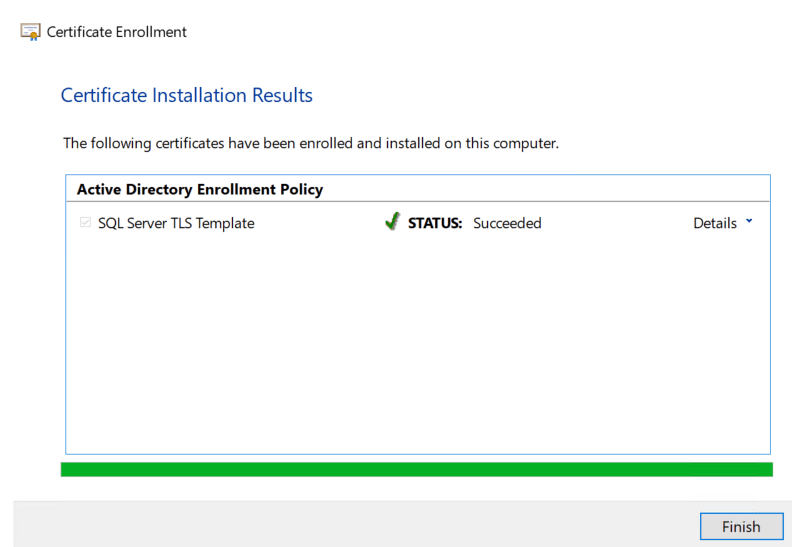
Step 11: Click Finish
If everything looks good and the status says Succeeded, click finish.
Adding Your New Certificate To SQL Server
You should now see your new certificate in the Certificates folder:
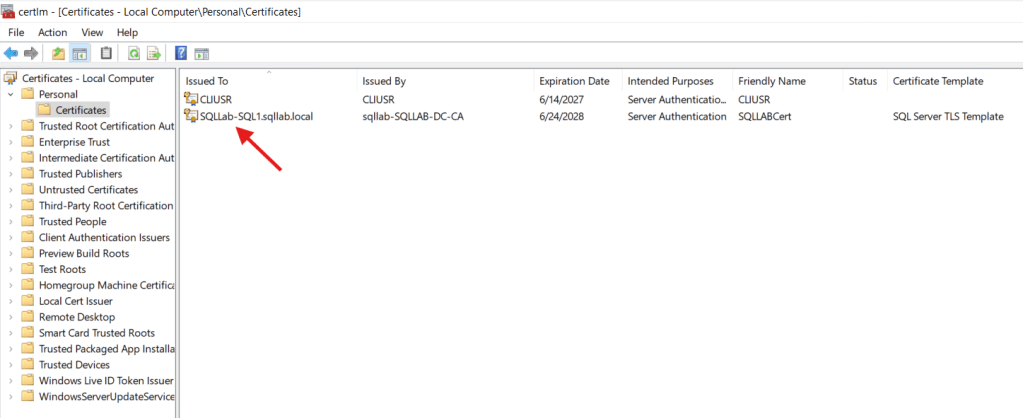
Now, we need to add our new cert to SQL Server. Here are the steps to do that:
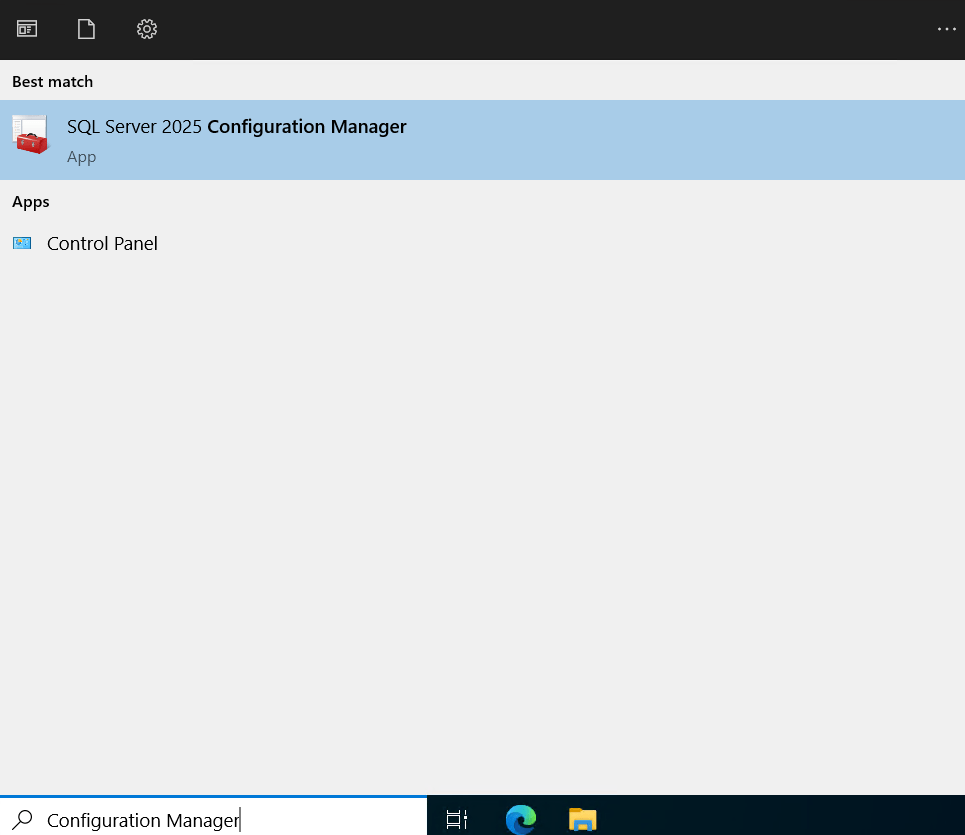
Step 1: Open Configuration Manager
On your server, in the search bar, search for Configuration Manager and open it up.
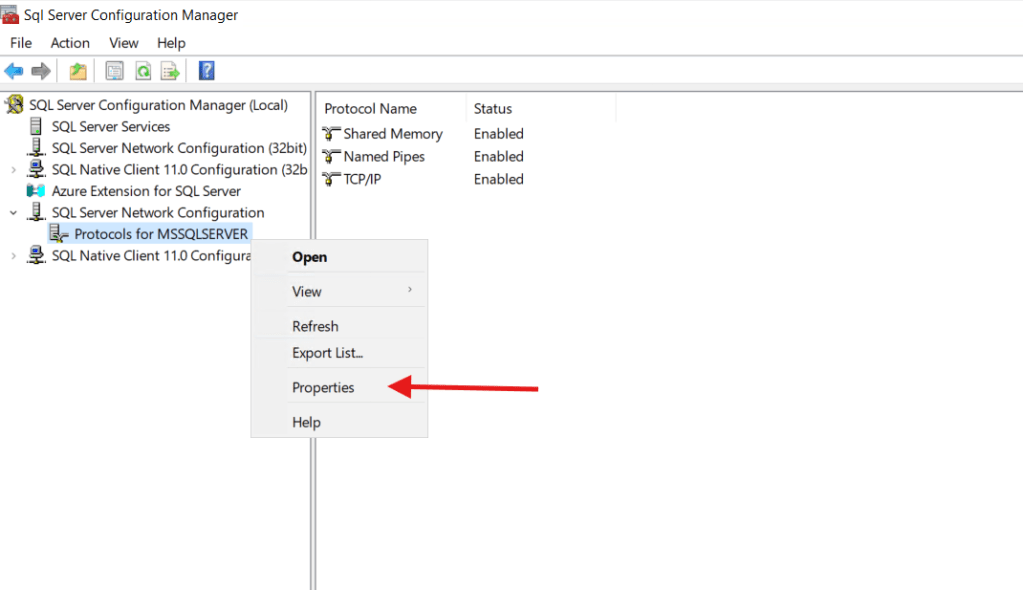
Step 2: Navigate To Protocols For MSSQLSERVER Properties
Once Configuration Manager is open, on the left side, navigate to SQL Server Network Configuration -> Protocols for MSSQLSERVER (or whatever instance name you want to apply the cert to) -> Right Click -> Properties
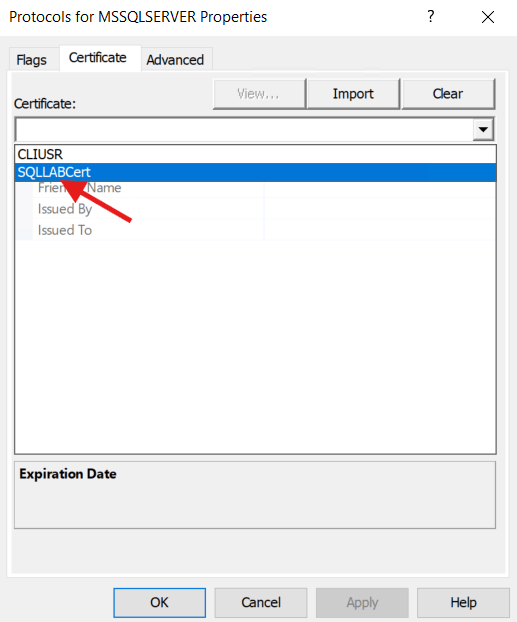
Step 3: Select Your Certificate
Once in the Properties menu, navigate to the Certificate tab. Hit the drop down and select your certificate you created earlier.
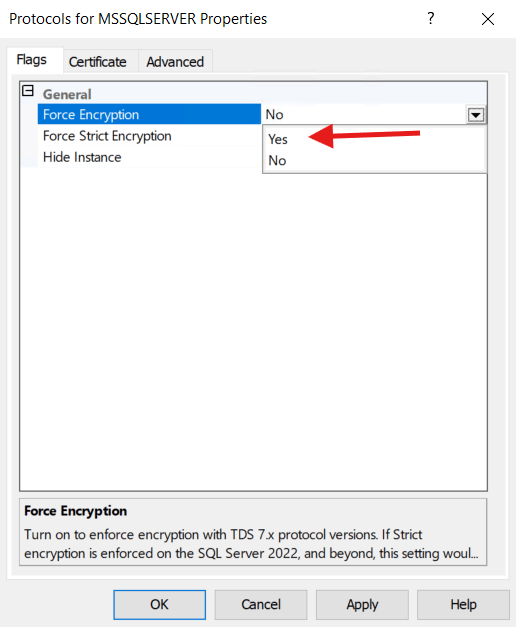
Step 4: Switch The Encryption Flag To Yes
Back on the Flags tab of the same Properties menu, switch the Force Encryption option from No to Yes. Keep in mind that this requires every client connecting to this instance to negotiate an encrypted connection. If you have legacy applications or older drivers that don’t support the configured TLS settings they will fail to connect after this change, so make sure you know what’s connecting before you flip this in production.
Step 5: Restart Your Server’s OS
When you click OK from the previous step, you’ll be notified that you need to restart SQL to take effect. Even though the docs state that you only need to restart SQL, I still like to reboot the OS just to make sure everything gets hit.
Step 6: Test
Now you can test to make sure that your connection from SSMS succeeds without having to check the Trust Server Certificate box and still keep your Encryption settings to Mandatory.
Nuances While Testing
This lab setup and testing went pretty smooth overall. One thing I noticed while testing is that when I first made the change for SQL to start using the new certificate, after the reboot SQL wouldn’t start. After looking in the event viewer under the Application logs, I found this:
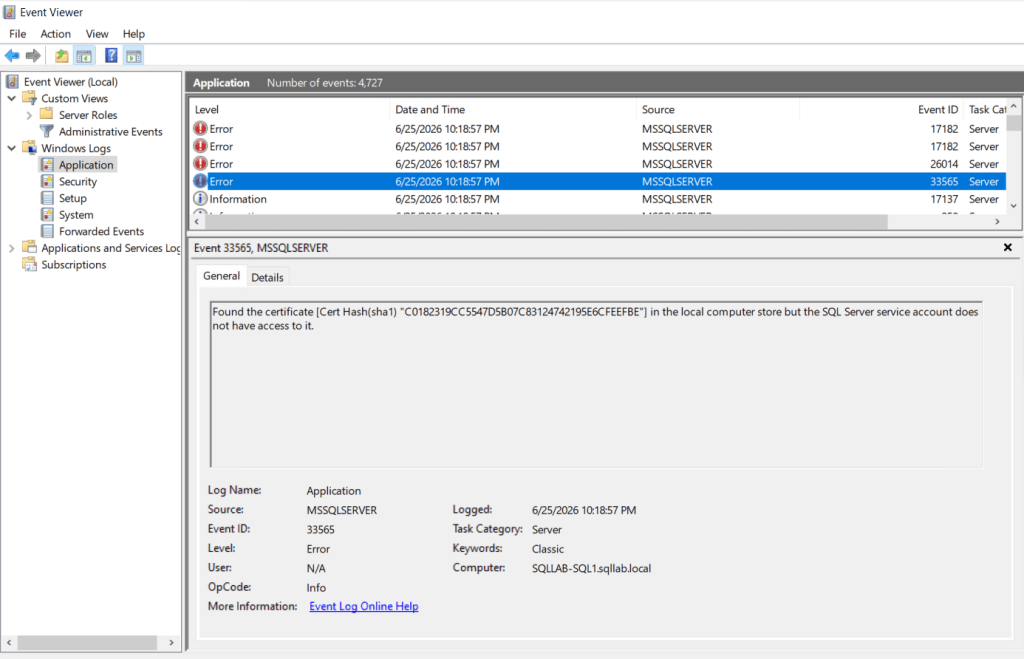
To fix this, you need to make sure that the account running SQL has access to the cert. I fixed this by adding it to the local administrators group on the server. I added it to the local administrators group because this is my lab environment, but if you are in a more restricted shop, make sure to always follow Principle of Least Privilege. The right way to do this is to ask your AD Admin to give the service account running SQL or whatever group it’s in read permissions on the certificate’s private key.
The other nuance is more lab environment specific if you wanted to test this on your own, not so much production environment specific, but I’ll mention it anyways. If you’re like me and are doing this in a Hyper-V environment, when you create the cert and try to connect from your local machine outside the Hyper-V environment, your laptop has no idea your lab CA exists. It’s not domain joined to your lab so it has no reason to trust anything that CA issued. To fix that you need to export the root CA cert from your DC and import it into your laptop’s Trusted Root Certification Authorities store. Once you do that your laptop knows to trust certs issued by your lab CA and you can connect without checking Trust Server Certificate. In a real production environment this is a non-issue because your workstation is already domain joined and already trusts your internal CA.
The Big Picture
This goes beyond just not having to check Trust Server Certificate in SSMS. This removes the need for your applications to have TrustServerCertificate=True as well, which results in a validated endpoint that ensures the data flowing in and out of your SQL Server is going to and from a trusted source. If you don’t have this configured, you’re rolling the dice and giving people with malicious intent a potential window into your data.
The TL;DR For The On-Call DBA
If SQL won’t start after applying a server cert, check the Application log in Event Viewer. You’re probably looking for Event ID 33565 which means the account running SQL doesn’t have access to the certificate’s private key. Ask your AD Admin to grant read permissions on the private key to your SQL service account. In a lab, or in a pinch, you can temporarily add the service account to local administrators to get back up and running, but follow least privilege in production.
If you’re trying to stop checking Trust Server Certificate in SSMS, here’s the short version of what needs to happen:
- Have your AD Admin create a certificate template in AD CS based on the Computer template with Subject Name set to Supply in the request and Server Authentication as the only Application Policy
- Request a cert from that template on each SQL Server, setting the Common Name to the server FQDN and adding DNS SANs for the short name, FQDN, and AG listener name
- Open SQL Server Configuration Manager, go to Protocols for your instance, Properties, Certificate tab, select the new cert
- On the Flags tab set Force Encryption to Yes
- Restart the OS
- Test your SSMS connection without Trust Server Certificate checked and with Encryption set to Mandatory
- You may need to close SSMS and re-open it to get a fresh authentication going.
If you’re doing this via a lab environment and your workstation can’t validate the cert, it’s probably not trusting your internal CA. Import the root CA cert from your domain controller into your workstation’s Trusted Root Certification Authorities store.

Leave a comment