
Before we begin, I first and foremost would like to give credit to Amy Abel for this idea. I’ve been blogging over the past few weeks about how the DBA role is evolving and there is a shift in mindset to have when approaching projects and tasks. I have mentioned before that I was a chronic button clicker, and that is still something I’m trying to break myself out of. When I was first structuring this post, I was going to walk you through how to set up a SQL Server lab environment that has a two node AG using Hyper-V. But, I was going to show you how to do this step-by-step, clicking through everything. This would have made this post incredibly long, or a short series in itself as there are a lot of moving parts to set up a lab environment like this. Plus, it would have wasted your time as well. But, thanks to Amy’s simple question of “Why don’t you automate it?”, you don’t have to suffer through that.
In the last post, we discussed how to set up a GitHub repository and connect it to your AzDO pipeline project so that we can leverage it when building out and running our patching pipeline. In this post, I am going to walk you through how you can use a tool I made to automatically build out your SQL lab environment so we can use it when testing our process. I’m going to include the link to the repo below so you can use it.
First Thing’s First: Resource Requirements
As much as I’d love to say that anyone can run this on any hardware, that’s unfortunately not the case for this environment. So, here is what is required for this to be able to run on your machine:
Windows 11 Pro or Enterprise with Hyper-V enabled (BIOS hardware virtualization and SLAT required). 16 GB RAM minimum, 20 GB+ recommended. 150GB free disk space on an SSD. Internet connection needed to download ISOs. Must be run as Administrator. PowerShell 5.1+ (pre-installed on Windows 11).
Getting Set Up
First, before you clone or run anything, please read the README files in both the root of the repo and in the root of the SQLLabBuilder folder. After that, clone or download the PowerShell-Scripts repository on GitHub. I like to function in Visual Studio Code, but whatever IDE you like to use is fine. Once you have the repo downloaded to the location of your choice, you’re then going to either want to open up VS Code, or PowerShell as Administrator. Once that’s done, you’ll want to change your directory to the folder location. Here’s what my setup looks like:

How To Build Your Lab Environment With One Line Of Code
When you’re ready to build your lab environment, all you have to do is call the StartLabBuild.ps1 script, pass in some parameters, and let it run. For our AzDO pipeline project, here’s the environment we’re going to be working with:
OS: Windows Server 2025
SQL Version: SQL Server 2025 Developer Edition
Here’s what that will look like when you run it:

.\StartLabBuild.ps1 -SQLVersion "2025"
Then hit enter.
Side Note: This supports creating AG lab environments for SQL 2019, 2022, and 2025 as well as creating regular AGs or contained AGs (2022+). Please read the README file in the SQLLabBuilder folder for more information.
Choosing A Location For Your VMs
When you run this, it will do pre-flight checks to make sure that your host is set up and configured properly to allow for the builder to build out your VMs. Once you pass all pre-flight checks, it will prompt you to select a drive where you want the script to put your VMs. For this case, I’m going to choose my external hard drive:
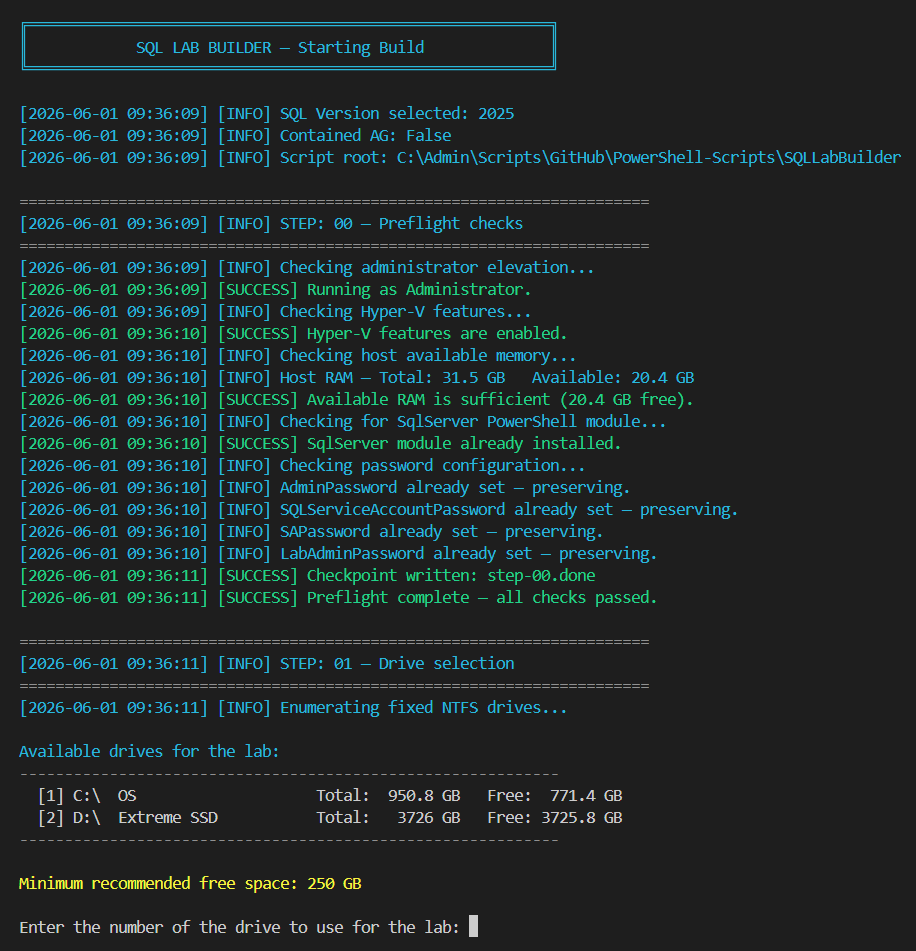
During the pre-flight checks, if there are any dependencies you don’t have (i.e. SQL Server module, etc.) it will automatically get you set up so you don’t have to do anything yourself.
Downloading ISOs
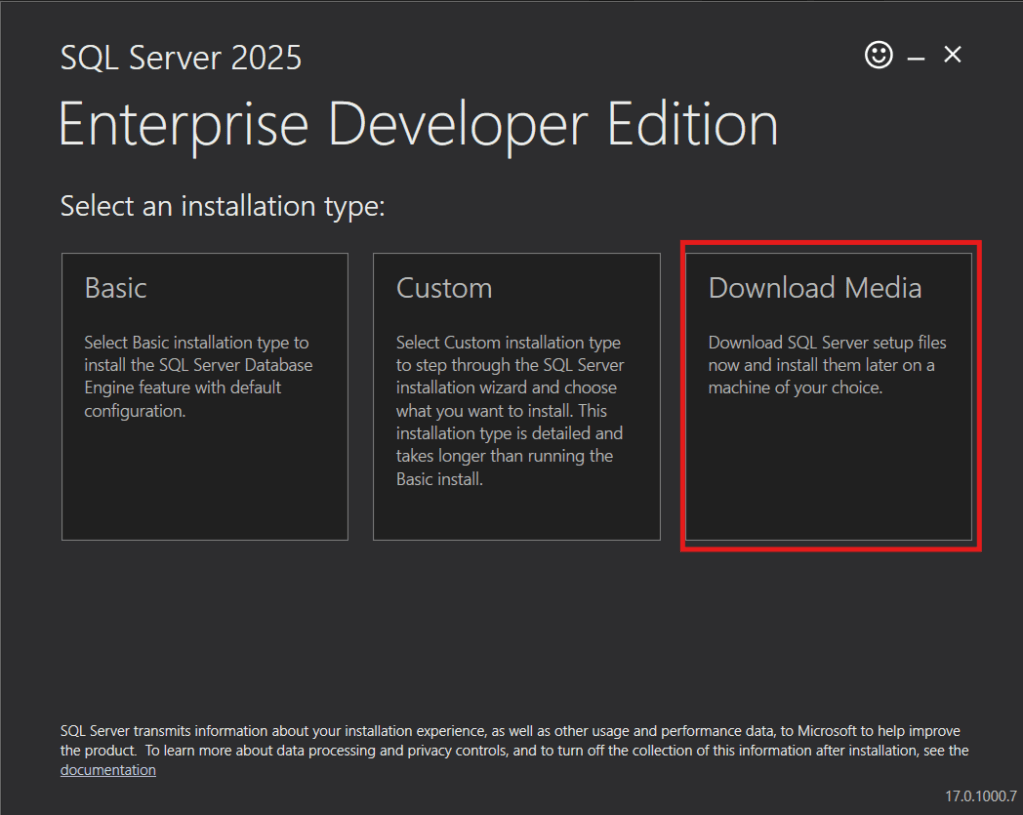
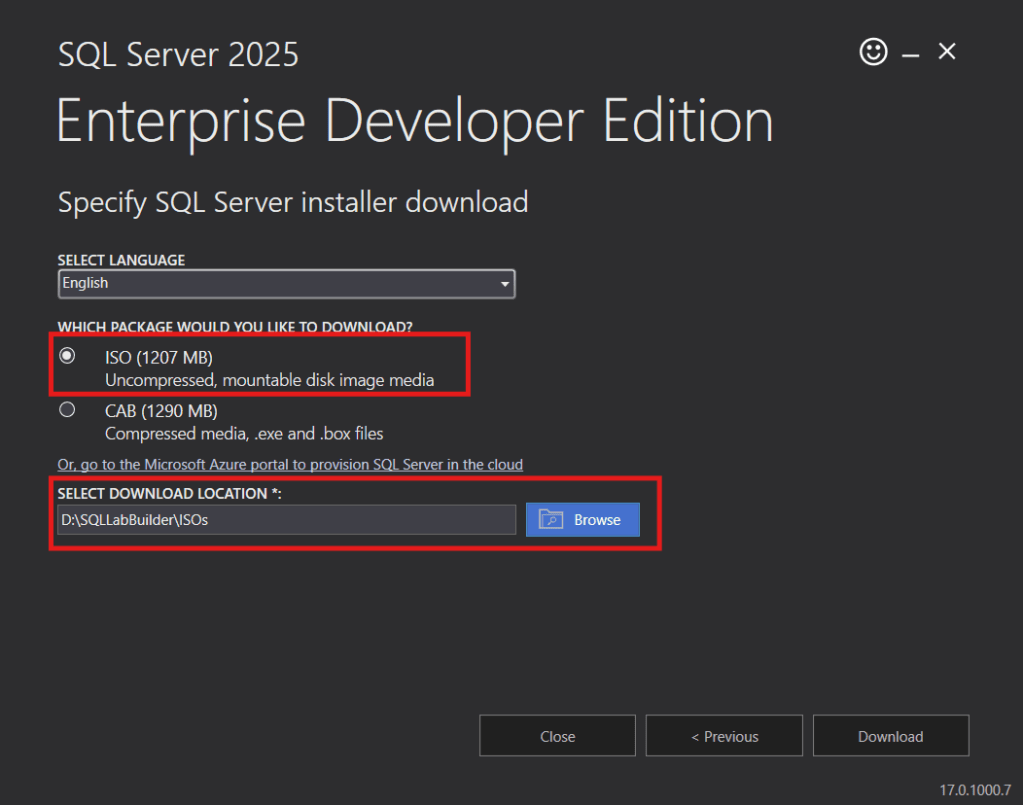
Next, it will download the Windows Server 2025 ISO for you and put it in the appropriate location for you. Then, it will attempt to download the SQL Server Setup for the version you selected. It’ll automatically pop up the setup wizard for you. All you have to do is hit “Download Media”, make sure you set your download to download the ISO file, and have your download location be pathed to the ISOs folder that the SQL Lab Builder script set up for you. Here’s what this looks like:
While this is running and downloading, you’ll notice your terminal polling every few seconds waiting for the download to appear in the expected location:
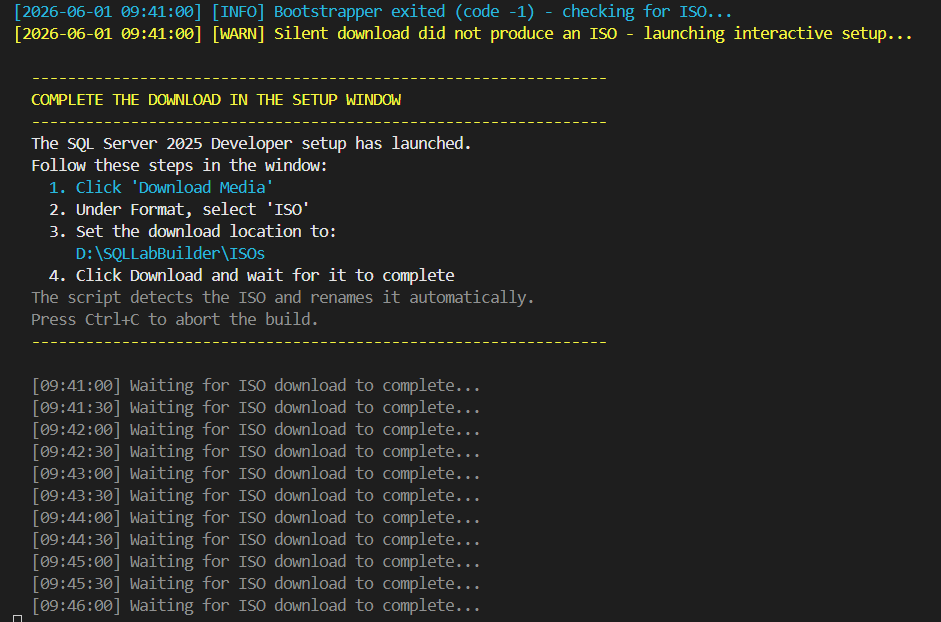
Notice the explicit instructions that are there for you to follow. Notice that it covers what I laid out above. Also, the script detects the ISO download and will automatically do the re-naming for you so you don’t have to worry about it.
Sit Back, And Watch The Magic
The prior step was the most manual thing about this process. After you download the SQL Server ISO media, it handles everything else. I made the script fully idempotent, so if a step fails on you and you have to re-run it, while the setup is happening, it marks internal checkpoints for you. So if a step is already complete, it will see that it has a checkpoint and just move on.
What It’s Doing
Behind the scenes, the script is setting up your networking, disks, ISO installs, setting up a domain controller, AD, accounts, configs, passwords, installing SQL, setting up the cluster, and setting up the AG for you. You can watch the entire process in the output it shows you in the terminal. I don’t want to include a bunch of screenshots of that because it would make this post unnecessarily long, but just know that any warnings that the script throws along the way in steps 7 and 9 are completely ignorable. Step 7 calls out some stuff relating to security settings and delegation. Step 9 calls out warnings from the cluster validation report. All good, all ignorable. Here’s what step 7 will throw:
WARNING: Windows Server 2022 domain controllers have a default for the security setting named "Allow cryptography algorithms compatible with Windows NT 4.0" that prevents weaker cryptography algorithms when establishing security channel sessions. For more information about this setting, see Knowledge Base article 942564 (http://go.microsoft.com/fwlink/?LinkId=104751). WARNING: A delegation for this DNS server cannot be created because the authoritative parent zone cannot be found or it does not run Windows DNS server. If you are integrating with an existing DNS infrastructure, you should manually create a delegation to this DNS server in the parent zone to ensure reliable name resolution from outside the domain "sqllab.local". Otherwise, no action is required. WARNING: Windows Server 2022 domain controllers have a default for the security setting named "Allow cryptography algorithms compatible with Windows NT 4.0" that prevents weaker cryptography algorithms when establishing security channel sessions. For more information about this setting, see Knowledge Base article 942564 (http://go.microsoft.com/fwlink/?LinkId=104751). WARNING: A delegation for this DNS server cannot be created because the authoritative parent zone cannot be found or it does not run Windows DNS server. If you are integrating with an existing DNS infrastructure, you should manually create a delegation to this DNS server in the parent zone to ensure reliable name resolution from outside the domain "sqllab.local". Otherwise, no action is required.
and here is what step 9 will call out:
WARNING: System Configuration - Validate Software Update Levels: The test reported some warnings.. WARNING: Network - Validate Network Communication: The test reported some warnings.. WARNING: Test Result: HadUnselectedTests, ClusterConditionallyApproved Testing has completed for the tests you selected. You should review the warnings in the Report. A cluster solution is supported by Microsoft only if you run all cluster validation tests, and all tests succeed (with or without warnings). Test report file path: C:\Users\Administrator.SQLLAB\AppData\Local\Temp\ClusterValidation.htm [2026-06-01 11:00:57] [INFO] [SQLLab-SQL1] Test-Cluster: Test-Cluster completed. Check report for details. [2026-06-01 11:00:57] [WARN] NOTE: Test-Cluster warnings about shared storage and single-network are expected and safe to ignore in this lab.
This is just calling out warnings in the cluster validation report relating to patching and one NIC.
The Finished Product
When all is said and done, you’ll get a summary output with connection information, IP information, and everything in between to give you a rundown of exactly what is set up. Here’s what your summary report will look like:
STEP: 15 — Generate summary report
SQL LAB BUILD COMPLETE
ENVIRONMENT
Domain: sqllab.local
Cluster: SQLLabCluster (IP HERE)
AG Name: SQLLabAG
AG Listener: SQLLabListener (IP HERE)
SQL Version: SQL Server 2025 Evaluation
Lab Root: D:\SQLLabBuilder
VIRTUAL MACHINES
SQLLAB-DC IP HERE Domain Controller
SQLLAB-SQL1 IP HERE SQL Primary Replica
SQLLAB-SQL2 IP HERE SQL Secondary Replica
CREDENTIALS
Windows Admin: Administrator / SqlLab2025!
Domain Admin: SQLLAB\Administrator / SqlLab2025!
SQL Service Acct: SQLLAB\sqlsvc / SqlLab2025!
SQL SA Login: sa / SqlLab2025!
SQL Lab Login: labadmin / SqlLab2025!
CONNECTING FROM YOUR HOST MACHINE
SQL Auth (works everywhere — listener and both nodes):
Server: SQLLabListener,1433 (or SQLLAB-SQL1 / SQLLAB-SQL2 for direct)
Login: labadmin
Password: SqlLab2025!
Windows Auth to individual nodes (NTLM via virtual switch):
Connect directly to SQLLAB-SQL1 or SQLLAB-SQL2.
NTLM works if SSMS is running as your current Windows user and the host
can reach the VM over the Hyper-V internal switch (IP HERE.x).
Windows Auth to the AG Listener:
The listener requires Kerberos, which needs a domain-joined client.
From a non-domain host, use SQL auth (labadmin) as shown above.
Read-intent secondary routing (SQL auth):
Server: SQLLabListener,1433 ApplicationIntent=ReadOnly
Login: labadmin Password: SqlLab2025!
No databases are pre-added to the AG — add your own via the primary replica.
HOSTS FILE ENTRIES (already added to C:\Windows\System32\drivers\etc\hosts)
IP HERE SQLLAB-DC SQLLAB-DC.sqllab.local
IP HERE SQLLAB-SQL1 SQLLAB-SQL1.sqllab.local
IP HERE SQLLAB-SQL2 SQLLAB-SQL2.sqllab.local
IP HERE SQLLabCluster SQLLabCluster.sqllab.local
IP HERE SQLLabListener SQLLabListener.sqllab.local
TEARDOWN
Run: .\Start-LabBuild.ps1 -Teardown
Or: .\Start-LabBuild.ps1 -Teardown -Force
LOG FILE
D:\SQLLabBuilder\logs\lab-build-20260601-104405.log
GENERATED: 2026-06-01 11:12:29
[2026-06-01 11:12:29] [SUCCESS] Summary saved to: D:\SQLLabBuilder\logs\lab-summary.txt
[2026-06-01 11:12:29] [WARN] Credentials also saved to: D:\SQLLabBuilder\logs\lab-credentials.txt
[2026-06-01 11:12:29] [WARN] SECURITY REMINDER: Delete D:\SQLLabBuilder\logs\lab-credentials.txt when the lab is decommissioned.
[2026-06-01 11:12:29] [SUCCESS] Step 15 complete.
SQL LAB BUILD COMPLETE
Name State CPUUsage(%) MemoryAssigned(M) Uptime Status Version
—- —– ———– —————– —— —— ——-
SQLLab-DC Off 0 0 00:00:00 Operating normally 12.0
SQLLab-SQL1 Off 0 0 00:00:00 Operating normally 12.0
SQLLab-SQL2 Off 0 0 00:00:00 Operating normally 12.0
Attached : False
BlockSize : 0
DevicePath :
FileSize : 5044094976
ImagePath : D:\SQLLabBuilder\ISOs\WinServer2025.iso
LogicalSectorSize : 2048
Number :
Size : 5044094976
StorageType : 1
PSComputerName :
Configured: IP HERE/24 GW=192.168.100.1 DNS=IP HERE
Configured: IP HERE/24 GW=192.168.100.1 DNS=IP HERE
Configured: IP HERE/24 GW=192.168.100.1 DNS=IP HERE
Connecting To Your Lab Environment
You should connect via the SQL Authentication user “labadmin” with its provided password. Integrated authentication is hit or miss with this, but the provided labadmin SQL Auth login will work every time. The reason for this is due to your host laptop not being domain joined to the lab environment and can’t authenticate. However, you walk away from this with a fully set up Always On Availability Group lab environment for your testing.

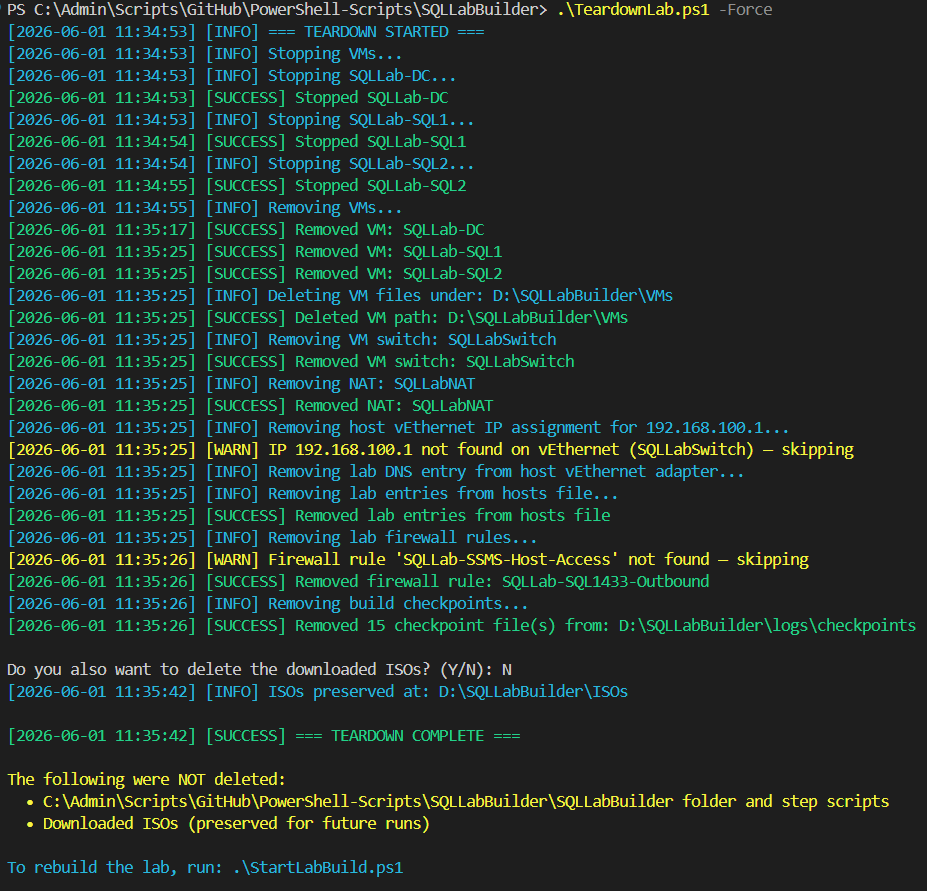
Tearing Down Your Lab Environment
When you’re all done with your lab environment and you want to tear it down you would run this:
.\TeardownLab.ps1 -Force
This will completely tear down your lab environment cleanly.
Starting Up Your Lab Environment
If you want to keep your lab environment around, after you turn off your 3 VMs and want to start up your lab environment cleanly, you’d run this:
.\StartLabBuild.ps1 -SQLVersion "2025" #or replace with the version you have installed.
This will cleanly turn on your VMs, make sure the virtual disks are good to go, and start up SQL. I recommend always using this when loading up your environment.
Summary
It is so important to have an environment where you can reliably test in without risking breaking your production environment. Aside from this being a key tool to help us with the AzDO pipeline we’re building, this is a useful tool in general for you to use. As mentioned before, please read the README file in the root of the PowerShell-Scripts repo and in the SQLLabBuilder folder as well. The README in the SQLLabBuilder folder will give you more information as to what the builder script does, as well as more features, parameters, and functionalities. In the next post, we will cover installing and configuring a self-hosted build agent on your lab domain controller.

Leave a comment